Intro
To place an order using the Click2Mail Add-in for Office 365, you must install the add-in and launch it. Click here to view instructions for installing the add-in.
The advantage of using the Click2Mail workflow in the add-in is that all products and product options are available at the click of a mouse. Quick2Mail is very streamlined for sending one letter to one person. They're both incredibly easy to use and the workflow you choose largely depends on how many recipients you're sending your letter to and your personal preference.
Get Started
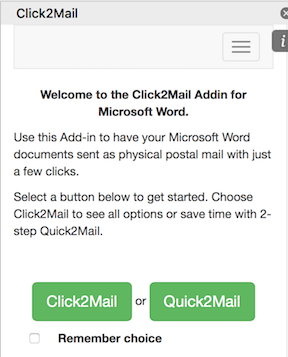
To use the Click2Mail workflow, select "Click2Mail" on the welcome screen after you launch the Add-in.
Select the product you want to mail and click "Continue".

Make any necessary changes to your document and click "Attach Document". If you make any additional changes, you'll have to reattach it.

Define Recipient
Tell us who you want to mail this document to. If you haven't already logged into your account, you'll be asked to do so during this part of the process. There are several ways to tell us who you want to mail the document to while you're using the Add-in.
Capture Address / Enter Address
If you're mailing to one person and the address is located somewhere in the body of the document, you can highlight it and click "Capture Address". The address will be populated into the fields on the right and you'll click "Create Single Address" to proceed.
If the address is not present in the body of the document, you can simply type the address into the fields in the add-in and click "Create Single Address" to proceed.


Previously Added Address
If you've used the address in a previous mailing it will already be in your account. Click the "My Addresses" tab to view a list of those addresses and also access any Address Books you may have created in one of Click2Mail's other productivity tools. Select the address you want to use and click "Continue".

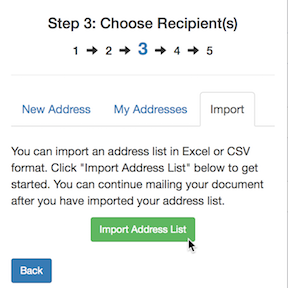
Import a List
You can also import an Excel or CSV file of addresses. Start by clicking the Import tab. Then click "Import List".
Give the list a name. Click "Choose File" and click "Import List".

Match fields from your mailing list with recipient address block fields. This will determine how we print the recipient address block on your mailpiece. Click "Continue".

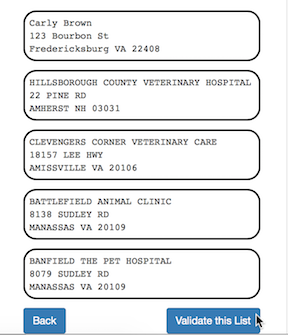
Review the sample mailing labels. Click "Validate this List".
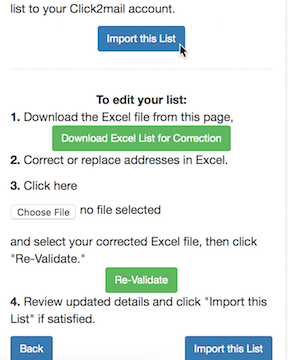
Click2Mail will tell you if you have any nonstandard or unmailable addresses. You can use the edit workflow beneath the "Import this List" button to download your list, make corrections and reupload it. Assuming you don't have any addresses you'd like to correct, you can simply click "Import this List".
Select Job Options and Submit Order
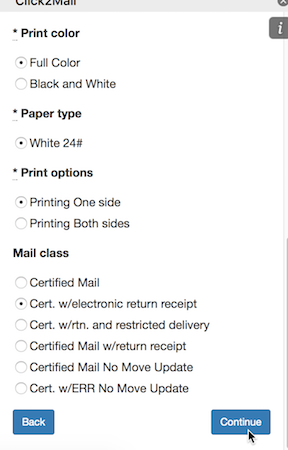
Select your print options and click "Continue".
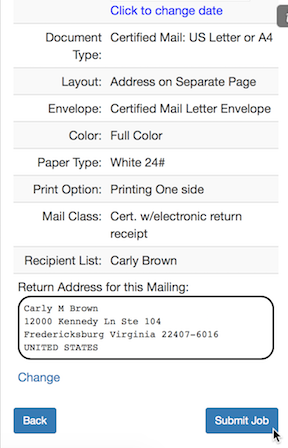
Confirm your job options and click "Submit Job".
The Add-in will confirm that your order was submitted. You'll also receive order confirmation via email.

Carly Brown
Comments